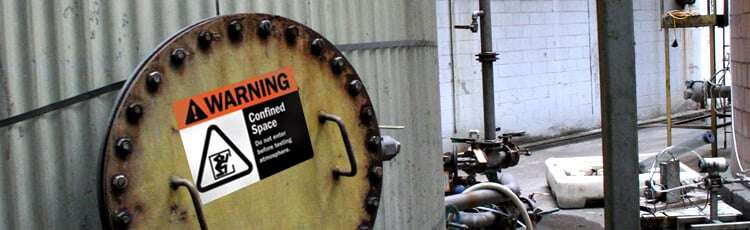
Pipes can put people and facilities in danger if no one knows what's flowing through them. Pipe labels help provide essential information where it's needed most to keep everyone safe. A comprehensive pipe marking system can benefit all types of facilities to support safety programs.
Common Pipe Marking Standards

The purpose of pipe marking is to communicate the contents of pipes and provide important details if specific hazards exist, like extreme temperatures or pressure.
Pipe labels are also important for maintenance and emergency workers to help easily identify pipe contents to respond to issues quicker and safely. The pipe marking standard you choose will depend on your facility type and location. Some industries and jurisdictions will have additional legal requirements. Here's an overview of the most common pipe marking standards a variety of industrial facilities and industries use:
General Pipe Marking: ANSI/ASME A13.1
The American National Standards Institute (ANSI) offers a general approach for labeling piping systems in industrial and power plants in their Scheme for the Identification of Piping Systems or ANSI/ASME A13.1. It's the broadest and most common pipe marking recommendation in the United States and is an excellent starting point for most pipe marking projects in most industries.
It also applies to commercial and institutional facilities including buildings used for public assembly. However, it does not apply to buried pipelines or electrical conduits.
Are you outside of the United States?
If your facility operates in the United Kingdom, Europe, Australia, and beyond, you'll need to follow relevant standards. Get handy resources like a UK pipe marking chart, articles, and guides that cover pipe marking requirements in different countries on our pipe marking resources page.
OSHA
OSHA doesn't have requirements for pipe labeling, although, it's still a vital part of maintaining a safe workplace. Pipe labeling falls within the scope of OSHA's General Duty Clause, which covers all potential hazards in the workplace.
In standard 1910.261(a)(3)(ii), OSHA recommends following ANSI/ASME A13.1 for best practices as well as labeling all pipes with their contents to help with general facility maintenance and communication.
Facilities whose pipes do not have labels may be subject to a citation if the following apply:
- Pipes with contents that are hazardous, or could create hazardous conditions
- Pipe serves a safety purpose, as part of hazard prevention or emergency response
- If you need to redirect the flow, shut off, or adjust to allow for maintenance or other necessary work.
- If the pipe or its contents could affect procedures during an emergency.
Confusion over pipe contents in these instances can result in injury and even death, which makes labeling them important.
Ammonia Pipe Marking: IIAR Bulletin 114

It's important that facilities with ammonia refrigeration systems use pipe labels to improve the visibility of the system's parts to help reduce the chances of toxic ammonia exposure.
The International Institute of Ammonia Refrigeration (IIAR) provides guidelines for labeling ammonia piping and components in their Identification of Ammonia Refrigeration Piping and Systems Components standard, or IIAR Bulletin 114. It breaks down a color scheme, label format, sizing recommendations, and abbreviations for pipe markers.
These label requirements align with ANSI/ASME A13.1 for consistency and serve as the preferred style to identify pipes that carry toxic contents like ammonia.
Before you get marking, assess your piping system and challenges in your workplace. Once you determine the pipe labeling standard that's right for your facility, you'll need to understand the elements to include on the label.
The Components of a Pipe Label
There are five elements that make an effective pipe label, according to ANSI best practices. Luckily, most pipe marking standards use these same elements.
Text
Identify the pipe's contents by name. You may also choose to list the temperature or pressure if either presents a hazard.
Size
Choose an appropriate size label and text size so it can be easily seen and understood. ANSI A13.1 outlines minimum label and text sizes based on a pipe's outer diameter. Here's a chart with minimum size suggestions:

| 0.75 ? 1.25 inches | 1 x 8 inches | 0.5 inches |
| 1.25 ? 2.0 inches | 1 x 8 inches | 0.75 inches |
| 2 ? 7 inches | 2 x 12 inches | 1.25 inches |
| 7 ? 10 inches | 3 x 24 inches | 2.5 inches |
| Over 10 inches | 4 x 32 inches | 3.5 inches |
For pipes less than 0.75 inches in diameter, we recommend using a permanent tag to identify them for the best visibility.
Direction of flow
Use arrows to show the direction of the pipe's contents flow. If the contents can flow in either direction, use multiple arrows.
Label placement
Always consider how someone will approach and view a pipe. Labels must be visible from a person's point of normal approach. For example, if a pipe is directly overhead, apply the label below the centerline. If the pipe is below eye level, apply the label above the centerline for a clear view.
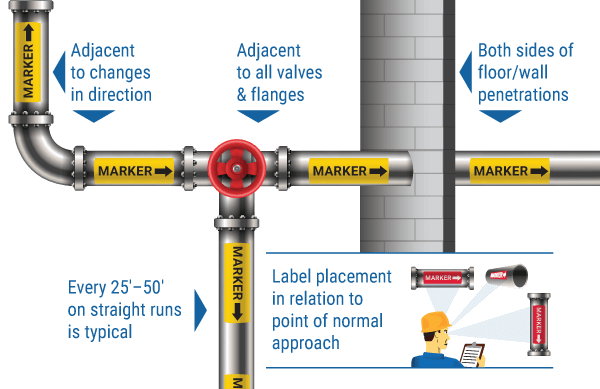
Best practices for the most effective label placement include:
- Every 50 feet on straight runs of pipe (or every 25 feet if more visibility is necessary)
- On both sides of floor, wall, or ceiling penetrations
- Next to all valves and flanges
- Where pipes change direction
Color coding
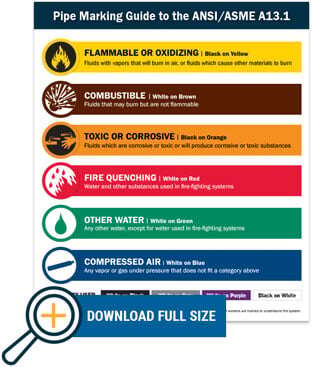
ANSI/ASME A13.1 recommends implementing a pipe marking color code. A color code helps improve the recognition of pipes while helping quickly alert people to the type of hazard potentially posed by a pipe's contents.
ANSI Z535.1 Safety Colors standard suggests color shades to use for the best level of identification to employees with normal and color-deficient vision. There are six predefined colors to identify broad types of pipe contents and four user-identified combinations that can be used separately by each facility using the standard.

| Pipe contents | Colors | User-defined colors |
| Fire quenching fluids | Red marker with white text | White on black |
| Toxic and corrosive fluids | Orange marker with black text | White on gray |
| Flammable and oxidizing fluids | Yellow marker with black text | Black on white |
| Combustible fluids | Brown marker with white text | White on purple |
| Other water (potable, cooling, boiling, etc.) | Green marker with white text | |
| Compressed air | Blue marker with white text |
To easily reference ANSI pipe label requirements wherever you are, download our handy pipe marking chart.
What to Do Before Getting Started
It's a good idea to check with your local authorities to make sure you're fully complying with the law before getting started pipe marking. There are a few important factors to consider that could significantly affect the success of your pipe marking system, including:
Size of your piping system: do you have a small or large piping system? Do you have multiple systems? This will help determine the most efficient method to implement to carry out your pipe marking system.
Condition of pipes: evaluate the physical condition of your pipes. Are the surfaces of pipes dirty, greasy, or rusty? You can mark pipes with hard-to-label surfaces like these with durable valve tags and pipe grabber sleeves that provide a clean surface.
Contents of pipes: do you have hazardous materials or extremely hot or cold contents running through your pipes? This will likely require certain supplies that can hold strong under high heat and harsh exposures to ensure your labels remain intact and legible.
Workplace environment: evaluate your facility for general hazards. Are there obstacles during day-to-day operations that could affect the condition or visibility of your labels? Consider things like potential exposures to weather, abrasion, and general wear and tear.
Evaluating your piping system before implementing pipe marking can help prevent potential hazards and accidents down the line.
Next Steps for Pipe Marking
To see how to implement a pipe marking system in your facility, see our in-depth article on getting started with pipe marking. You can also request our free Best Practice Guide to Pipe Marking for in-depth instructions and tools to help create an effective system.
During the process, you'll find that choosing the right supplies is an important part of ensuring a successful system. Fortunately, there are high-quality solutions made to resist damage in challenging environments to ensure long-lasting labels.
When you're ready to create pipe labels and other visual signals for your facility, you can rely on the DuraLabel line of industrial label and sign printers, and the PathFinder line of floor marking and safety tapes. Our products are all engineered to make long-lasting identification and markings for a variety of industrial needs, and they're perfectly matched for pipe marking implementation.
Ready to get started with pipe marking in your facility? Read our How to Get Started with Pipe Marking article for comprehensive instructions on implementing a pipe marking system.

Industry
Military
Challenge
The problem your customer faced. This content should be short and skimmable. Two to three sentences are a good standard for the right amount of content.
Results
The impact your customer saw. Two to three sentences are a good standard for the right amount of content.
Key Production
Partnering with Growth has transformed our business. Their cutting-edge strategies and AI-powered targeting have significantly boosted our online presence and revenue.

Partnering with Growth has transformed our business. Their cutting-edge strategies and AI-powered targeting have significantly boosted our online presence and revenue.
Partnering with Growth has transformed our business. Their cutting-edge strategies and AI-powered targeting have significantly boosted our online presence and revenue.